
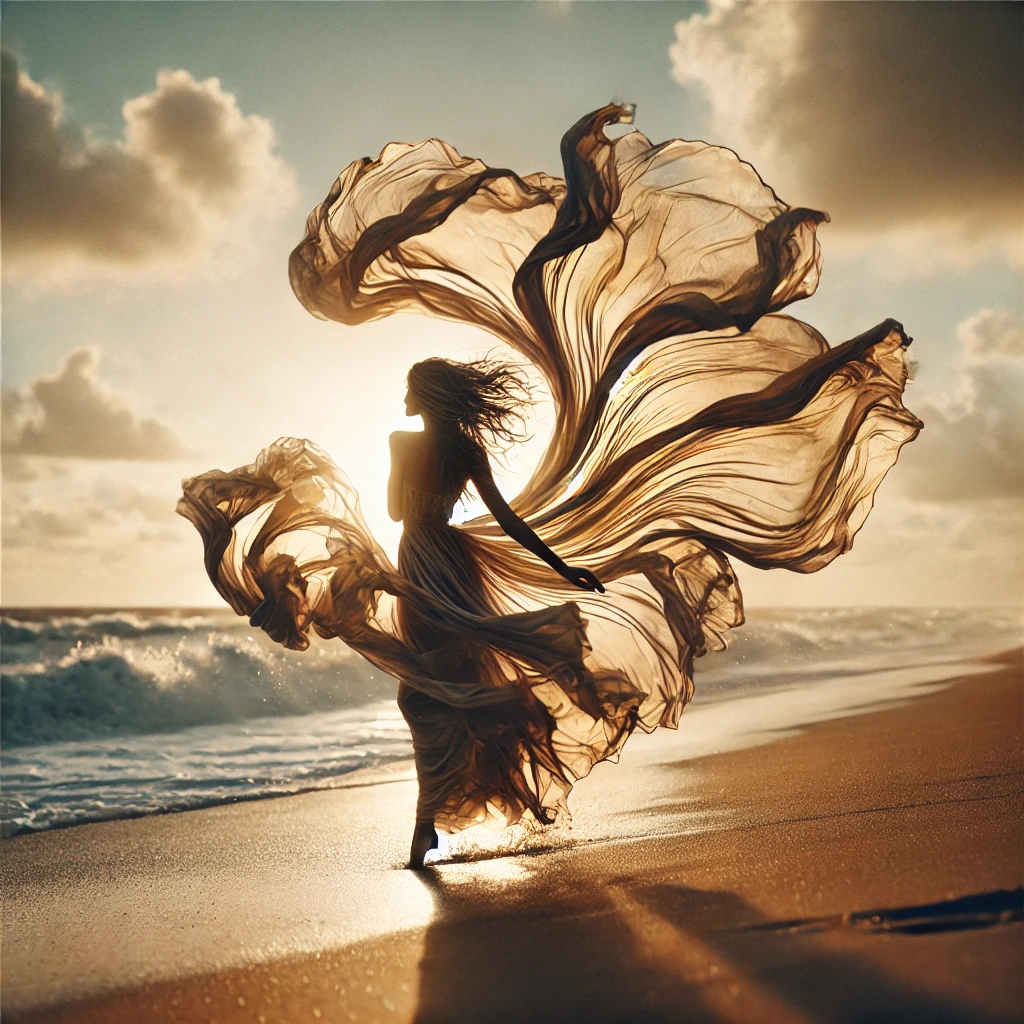
A sarong is more than just a piece of fabric—it embodies elegance, movement, and fluidity. Unlike structured clothing, it responds beautifully to motion, creating stunning visual effects when captured correctly. Whether you’re shooting an editorial fashion spread, a beach photoshoot, or a conceptual art project, mastering the flow and texture of a sarong can elevate your imagery to the next level. However, achieving this requires an understanding of fabric movement, lighting, and camera techniques. In this guide, we’ll break down the key aspects of capturing texture of a sarong in motion, ensuring each shot tells a compelling story.
Why Trust The Candid Shoot?
At The Candid Shoot, we publish practical photography guides based on real-world shooting techniques, camera knowledge, lighting setups, and post-processing workflows. Our goal is to simplify photography concepts so beginners, hobbyists, creators, and professionals can capture better images with confidence.
Every guide is carefully reviewed and updated to reflect current photography trends, camera technology, AI-powered editing tools, and industry best practices. Whenever relevant, we reference trusted photography resources and official manufacturer documentation to ensure our recommendations remain accurate and reliable.
Whether you’re photographing products for an online store, social media, Amazon listings, or personal projects, our tutorials are designed to help you improve image quality while making informed equipment and workflow decisions.
Quick Answer
Product photography is the process of creating high-quality images that accurately showcase a product’s appearance, features, and details. Effective product photography combines proper lighting, composition, camera settings, backgrounds, and editing techniques to produce professional images that increase customer trust and improve online sales.
Learn More About Product Photography
If you’re looking to master product photography from beginner to advanced level, don’t miss our complete guide:
👉 Powerful Product Photography Secrets for Photos
Inside this comprehensive guide, you’ll learn:
- Camera settings for product photography
- Lighting techniques for every budget
- Background selection
- Composition tips
- Lens recommendations
- Editing workflow
- AI tools for product photography
- Studio setup ideas
- Photography mistakes to avoid
- Professional workflow from planning to final image
This pillar guide connects all of our product photography tutorials in one place, making it the perfect starting point for beginners and experienced photographers alike.
1. Why Motion is Essential in Sarong Photography
A. Injects Energy and Emotion
Static images can be beautiful, but incorporating movement adds a sense of life and excitement. A flowing sarong brings energy, making the shot more engaging and dynamic.
B. Showcases the Fabric’s Texture and Quality
Certain materials, such as chiffon and silk, create soft waves when they move. This motion highlights the fabric’s texture and quality, making it appear more luxurious and visually appealing.
C. Enhances the Model’s Presence
Movement in fabric also enhances the model’s posture and expression. Instead of stiff poses, the subject looks natural and effortless.
D. Creates a High-Fashion Aesthetic
Many editorial and luxury campaigns use flowing fabrics to elevate their images. By mastering motion photography, you can achieve this polished, high-end look in your own work.
2. Choosing the Right Sarong Fabric for Motion
Not all fabrics respond the same way to movement. The choice of material plays a crucial role in how the sarong flows in a shot.
A. Lightweight & Flowing Fabrics (Ideal for soft, airy movement)
- Chiffon – Creates a dreamy, translucent effect
- Silk – Smooth and luxurious with elegant draping
- Organza – Holds its shape while still flowing naturally
- Rayon or Modal Blends – Soft yet offers a controlled movement
B. Structured Fabrics (Best for dramatic, sculptural shots)
- Linen – Gives an organic, relaxed motion
- Cotton Voile – Light yet structured for elegant draping
- Satin – Reflects light beautifully, adding a polished look
💡 Tip: Avoid stiff fabrics that don’t catch wind or light properly, as they will look rigid in motion shots.
3. Camera Settings for Capturing Motion & Texture
Understanding the right camera settings can make a huge difference when capturing the flow and texture of a sarong.
A. Shutter Speed Adjustments
- Fast Shutter Speed (1/500s – 1/2000s): Freezes motion, capturing crisp waves and folds in the fabric.
- Slow Shutter Speed (1/30s – 1/100s): Introduces intentional blur for a dreamy, fluid effect.
💡 Experiment with different shutter speeds to balance sharpness and movement.
B. Aperture for Depth & Detail
- Wide Aperture (f/2.8 – f/4.5): Creates a soft background blur, emphasizing the sarong.
- Narrow Aperture (f/8 – f/11): Ensures all fabric details remain sharp and well-defined.
C. ISO Considerations
- Keep ISO low (100-400) in bright outdoor settings to avoid grain.
- Increase ISO in low-light conditions, but be cautious of noise.
4. Lighting Techniques to Enhance Fabric Movement
Lighting plays a crucial role in bringing out the depth, texture, and motion of the fabric.
A. Natural Light (Best for soft, organic looks)
- Golden Hour (Sunrise/Sunset): Adds warmth and enhances fabric translucency.
- Backlighting: Creates a glowing effect through sheer fabrics.
- Side Lighting: Highlights fabric folds and depth.
B. Artificial Light (Best for editorial and studio shoots)
- Softbox or Diffused Light: Maintains fabric texture while reducing harsh shadows.
- High-Speed Flash: Freezes fabric in motion for dramatic, high-fashion shots.
- Spotlights & Gels: Add depth and creative color effects.
💡 For outdoor shoots, a reflector helps balance shadows and highlight details.
5. Directing Motion for a Natural Look
Knowing how to guide the movement of the sarong is essential for achieving a natural, effortless flow.
A. Wind Techniques
- Natural Wind: Shoot in breezy locations like beaches, cliffs, or open fields.
- Handheld Fans: Control the direction and intensity of fabric movement.
- Blower Fans (Studio Shoots): Achieve dramatic high-fashion looks.
B. Posing for Movement
- Twirl or Spin: Creates a flowing, circular fabric effect.
- Step & Lift: Walking while lifting the sarong enhances movement.
- Jump & Toss: Tossing the sarong mid-air captures dynamic energy.
💡 Encourage the subject to move naturally, letting the fabric react organically.
6. Editing Techniques for Motion & Texture of a Sarong in Motion
Post-processing can enhance movement while keeping the image authentic.
A. Color Adjustments
- Increase warmth to enhance golden tones.
- Adjust vibrance to make the fabric pop.
B. Enhancing Texture & Highlights
- Use clarity & contrast tools to emphasize fabric folds.
- Add soft shadows to create depth.
C. Motion Blur for a Dreamy Effect
- Selective motion blur can enhance a sense of movement.
- Use radial or directional blur to maintain a realistic effect.
💡 Avoid over-editing—preserve the fabric’s natural beauty.
Final Thoughts: Mastering Sarong Photography in Motion
Capturing the texture of a sarong in motion requires a thoughtful blend of technique, lighting, and direction. The right fabric, movement, and camera settings will transform an ordinary shot into an editorial masterpiece. Whether you’re working with natural wind, artificial fans, or subtle movements, the key is to make the fabric appear effortless and full of life.
✨ Experiment, play with motion, and let the fabric tell a story.
Frequently Asked Questions:
Related Product Photography Guides
Continue improving your photography skills with these helpful resources:
- Product Photography Lighting Guide
- Best Cameras for Product Photography
- DIY Product Photography Setup at Home
- White Background Product Photography Tips
- Product Photography Camera Settings Explained
- Best Lenses for Product Photography
- AI Product Photography Tools
- Product AI Photo Editing Guide
- Photography Tutorials for Beginners
Recommended Resources
Improve Your Product Photography Skills
Photography is a skill that improves with practice. Try experimenting with different lighting setups, camera angles, and editing techniques to discover what works best for your products. Even small improvements in composition and lighting can make your images look significantly more professional.
If you enjoyed this guide, explore more tutorials on The Candid Shoot to continue improving your photography skills.






Leave a Reply