Flat lay photography is a powerful way to showcase products with style and creativity. Whether you’re working with fashion, food, or tech gadgets, this top-down photography technique can bring your brand to life. However, achieving a polished and professional look requires thoughtful planning and execution. This guide will walk you through essential equipment, lighting tips, composition techniques, and editing strategies. By the end, you’ll have the knowledge to create visually stunning flat lay product photography that stand out. Let’s dive in!
1. What Is Flat Lay Photography?
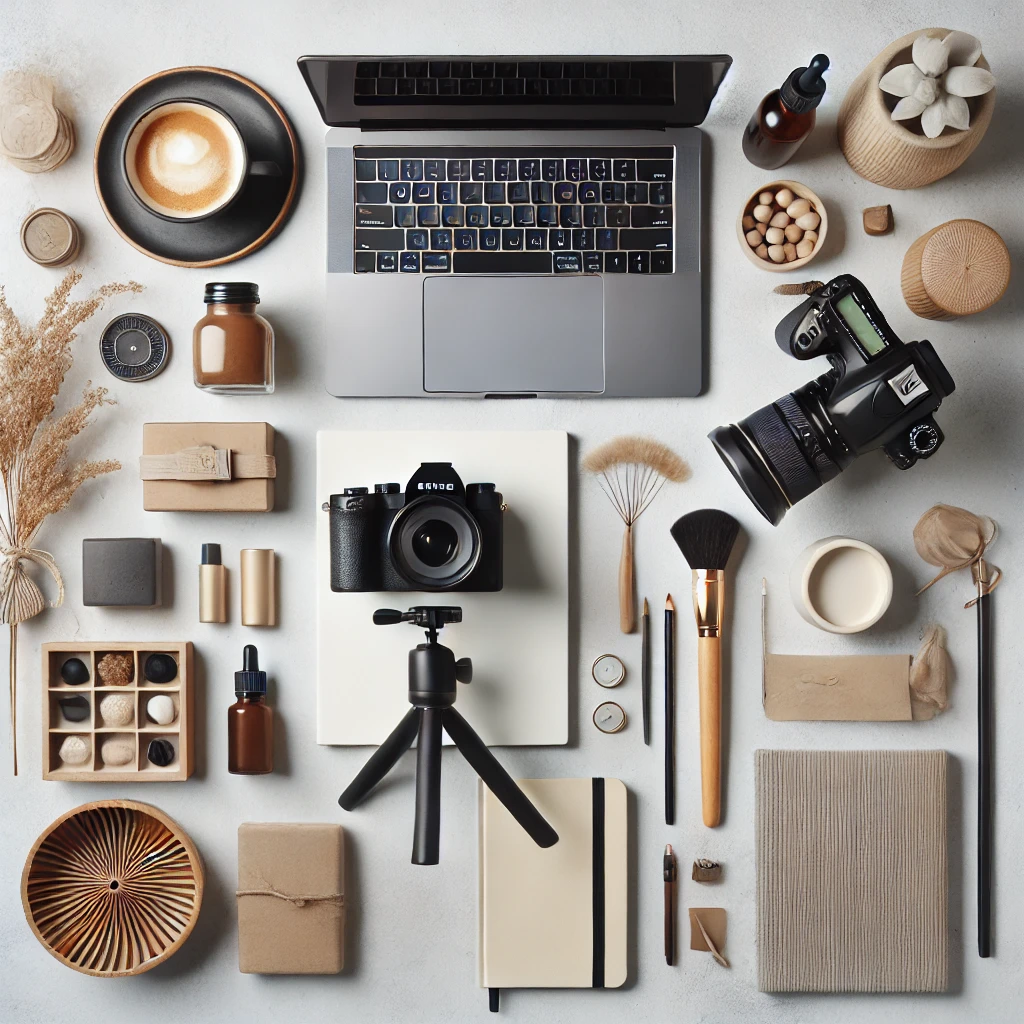
Flat lay photography is a technique where objects are arranged on a flat surface and photographed from directly above. This approach creates a clean and structured composition that highlights the details of the products.
Why It Works So Well
- Eye-Catching Appeal: The structured layout draws attention effortlessly.
- Highly Versatile: Works for a range of industries, from beauty to technology.
- Perfect for Storytelling: Elements can be arranged to create a narrative.
- Great for Social Media: Flat lays perform well on Instagram and Pinterest.
By carefully planning your setup, you can make even simple products look sophisticated.
2. Essential Equipment for Flat Lay Product Photography
While you don’t need expensive gear to get started, the right tools can elevate your photography quality.
Must-Have Equipment
- Camera: A DSLR or mirrorless camera provides better control, but a high-quality smartphone can work too.
- Tripod: Helps maintain consistency and keeps shots steady.
- Lenses: A 50mm or 24-70mm lens delivers sharp results. A macro lens is useful for close-up details.
- Backdrop: Choose white or neutral backgrounds for a clean look. Wooden or marble textures add elegance.
- Lighting: Soft natural light works well, but LED panels or softboxes create a controlled environment.
- Props & Accessories: Small items like fabric, leaves, or books add depth and character.
With these essentials, setting up a professional-looking flat lay becomes much easier.
3. Perfecting Your Lighting Setup
Lighting plays a crucial role in ensuring your flat lay images look sharp and professional. The right light prevents harsh shadows and enhances the product’s details.
Best Lighting Practices
- Use Natural Light: Position your setup near a window for soft, diffused lighting.
- Avoid Direct Sunlight: Harsh shadows can overpower the composition.
- Try Artificial Light: Softbox lights or LED panels create consistent lighting conditions.
- Use Reflectors: White foam boards bounce light back onto the subject, reducing dark spots.
Experiment with different lighting angles to see what works best for your setup.
4. Composition Techniques for Stunning Shots
Great composition makes a flat lay visually appealing and well-balanced. A structured layout ensures that the product remains the focal point.
Key Composition Rules
- Rule of Thirds: Position key elements along grid lines for a balanced look.
- Leading Lines: Use props to guide the viewer’s eyes toward the main subject.
- Negative Space: Leaving empty areas enhances clarity and focus.
- Layering: Add elements of different heights for dimension.
- Consistent Colors: A well-matched color scheme ties the image together.
An intentional arrangement will create a polished and aesthetically pleasing image.
5. Styling Your Flat Lay Setup
Props and background choices can either enhance or clutter your image. Keep the styling intentional and cohesive.
Tips for an Aesthetic Look
- Stick to a Theme: Choose props that complement the product.
- Keep It Simple: Too many elements can create a cluttered feel.
- Play with Textures: Smooth surfaces contrast beautifully with rough textures.
- Incorporate a Human Touch: Adding hands or personal items increases relatability.
- Tell a Story: Arrange objects to create an engaging visual narrative.
Well-thought-out styling enhances the product’s appeal without overpowering it.
6. Camera Settings for Crisp & Clear Images
Fine-tuning your camera settings ensures clarity and depth in your shots.
Recommended Settings
- ISO: Keep it between 100-400 to reduce noise.
- Aperture: Use f/4 to f/8 for a sharp focus.
- Shutter Speed: Set at 1/125s or faster to avoid blur.
- White Balance: Adjust based on lighting conditions to maintain accurate colors.
With the right adjustments, your images will appear clean and professional.
7. Editing for a Polished Look
Post-processing enhances the final image by correcting colors and refining details.
Editing Techniques
- Adjust Brightness & Contrast: Balance exposure levels for a vibrant look.
- Remove Distractions: Eliminate unwanted reflections or blemishes.
- Enhance Sharpness: Bring out details without over-processing.
- Crop & Align: Ensure proper symmetry and framing.
Best Editing Tools: Adobe Lightroom, Photoshop, Snapseed, Canva.
A well-edited image increases its impact and professionalism.
8. Avoiding Common Flat Lay Product Photography Mistakes
Mistakes can weaken an otherwise strong composition. Awareness of pitfalls will help refine your skills.
What to Watch Out For
- Uneven Lighting: Soft, even lighting prevents harsh shadows.
- Overcrowded Frames: Simplicity enhances focus and clarity.
- Wrong Camera Angle: Maintain a top-down perspective for a true flat lay.
- Over-Editing: Subtlety in post-processing keeps images natural.
Fine-tuning these details will significantly improve your final shots.
9. Using Flat Lay Product Photography for Marketing
A well-executed flat lay boosts brand appeal and engagement.
Best Practices for Different Platforms
- Instagram & Pinterest: High-contrast, visually striking images perform best.
- E-commerce Websites: Clean, distraction-free layouts highlight product details.
- Blogs & Editorials: Lifestyle-focused images tell a compelling story.
Flat lay photography is a valuable tool for building a strong visual presence.
Conclusion
Mastering flat lay product photography requires practice, creativity, and attention to detail. By refining composition, lighting, and styling, you can create compelling visuals that elevate your brand. Keep experimenting, and soon, your flat lays will captivate audiences effortlessly.
-
Vivo X300 Pro Photography Kit: Next-Gen Mobile Imaging
-

Empowerment Through Boudoir Photography: The Candid Shoot
-

Bold Photography: Creating Powerful & Confident Visual Stories
-

Jaipur’s Favorite Destination for Couple Shoots | The Candid Shoot
-
Vivo X300 Pro Photography Kit: Next-Gen Mobile Imaging
Discover the complete vivo X300 Pro photography kit guide with in-depth camera analysis, real-world case studies, portrait techniques, cinematic workflows, and pro-level tips. Learn how vivo X300 Pro transforms mobile photography for creators, influencers, and studio professionals. The vivo X300 Pro — Redefining Mobile Imaging for Creators Why the vivo X300 Pro Deserves a Dedicated
-
Empowerment Through Boudoir Photography: The Candid Shoot
Boudoir Photography as Empowerment Boudoir photography has evolved far beyond traditional notions of intimacy or sensuality. Modern boudoir photography is about empowerment, confidence, and self-expression, not merely performing for the camera. At its heart, boudoir photography is a visual dialogue between the subject and themselves, mediated by a professional photographer. It provides a private, safe
-
Jaipur’s Favorite Destination for Couple Shoots | The Candid Shoot
Why Couple Shoots Matter More Than Ever Couple shoots have evolved far beyond posed photographs and forced smiles. Today, couples look for experiences that feel natural, meaningful, and reflective of who they are together. A couple shoot is no longer about perfection. It is about presence, connection, and shared emotion. At The Candid Shoot, we
-
Bold Shoot Photographer with Studio in Jaipur | The Candid Shoot
The phrase “bold shoot photographer” often triggers assumptions—many of them incomplete, outdated, or shaped by stereotypes. In reality, bold photography has evolved far beyond shock value or surface-level aesthetics. Today, bold shoots represent self-expression, body confidence, emotional honesty, and artistic courage. At The Candid Shoot, bold photography is not about exposure—it is about expression. It
-
Styling Tips for Maternity Shoots: Looking Timeless, and Confident
Styling as the Silent Storyteller in Maternity Shoots Maternity shoots are not simply about documenting pregnancy. They are about honoring a season of transformation—physical, emotional, relational, and often spiritual. Styling plays a foundational role in how that transformation appears, feels, and endures through photographs. When people look back at maternity photographs years later, they rarely


