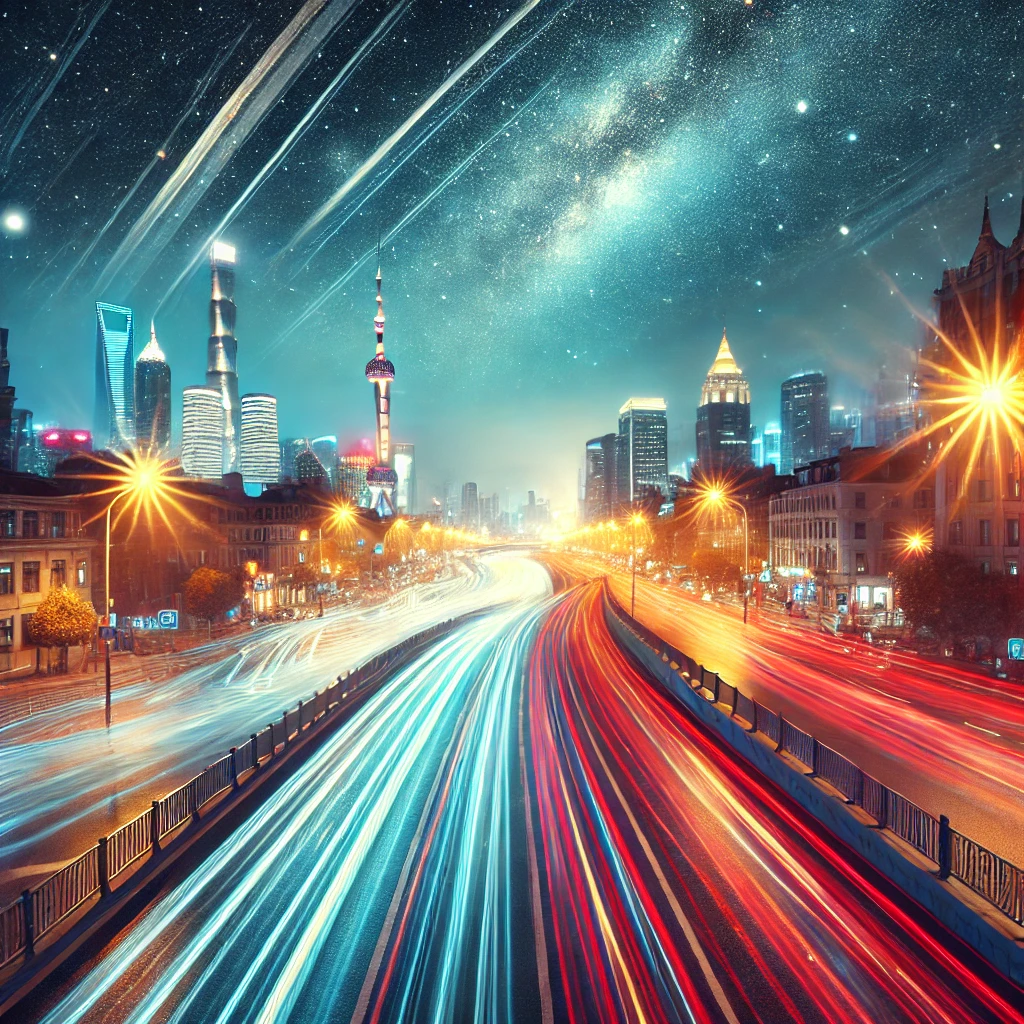
Long exposure photography is a powerful technique that allows photographers to capture mesmerizing night shots by using slow shutter speeds. This method can transform ordinary scenes into breathtaking compositions by enhancing light trails, reflections, and motion effects. Whether you’re photographing cityscapes, star trails, or smooth water surfaces, mastering long exposure can elevate your photography skills.
This guide will take you through everything you need to know about long exposure photography, including essential equipment, camera settings, composition techniques, and post-processing tips.
Understanding Long Exposure Photography
What is Long Exposure Photography?
Long exposure photography involves keeping the camera’s shutter open for an extended period to capture more light. This results in a unique effect where stationary elements remain sharp while moving objects appear blurred or streaked.
Some common subjects for long exposure include:
- Light trails from moving vehicles
- Star trails in astrophotography
- Smooth water effects in seascapes and waterfalls
- Silky clouds in landscapes
- Illuminated cityscapes at night
Essential Equipment for Long Exposure Photography
1. Camera with Manual Controls
A camera that allows you to manually adjust shutter speed, aperture, and ISO is essential. Most DSLRs and mirrorless cameras have these capabilities.
2. Tripod
Since long exposure photography requires slow shutter speeds, a sturdy tripod prevents camera shake and ensures sharp images.
3. Remote Shutter Release or Timer
A remote shutter release or the built-in timer function helps avoid vibrations caused by pressing the shutter button.
4. Neutral Density (ND) Filters
ND filters reduce the amount of light entering the lens, allowing for longer exposure times even in bright conditions. These are useful for capturing smooth waterfalls or motion effects in daylight.
5. Wide-Angle or Prime Lens
A wide-angle lens is ideal for landscape and cityscape long exposure shots, while a prime lens with a wide aperture can help in low-light situations.
Camera Settings for Long Exposure Photography
1. Shutter Speed
- The key to long exposure is setting a slow shutter speed. Depending on the subject, it can range from a few seconds to several minutes.
- For light trails: 5-30 seconds
- For star trails: 15 minutes or more
- For smooth water: 5-20 seconds
2. Aperture
- A narrow aperture (higher f-number like f/8 to f/16) ensures a greater depth of field and sharp details.
- If shooting in very low light, you may need a wider aperture (lower f-number).
3. ISO Settings
- Keep ISO low (ISO 100-400) to reduce noise and maintain high image quality.
4. White Balance
- Adjust white balance based on the lighting conditions. For night photography, Tungsten or Incandescent settings can help balance city lights.
5. Focus Mode
- Use manual focus, as autofocus struggles in low-light conditions.
- Focus on a bright light source or use Live View for better accuracy.
Composition Techniques for Stunning Long Exposure Shots
1. Leading Lines
- Use roads, bridges, or pathways to create depth and guide the viewer’s eye into the scene.
2. Framing and Perspective
- Experiment with different angles to add drama and uniqueness to your shots.
3. Use Reflections
- Reflections from water bodies, glass, or wet streets enhance the visual appeal of your long exposure images.
4. Incorporate Motion
- Capture moving cars, clouds, or people to create dynamic and artistic compositions.
Creative Long Exposure Photography Ideas
1. Light Trails from Vehicles
- Find a busy road and capture streaks of light from passing cars by using a 10-30 second exposure.
2. Star Trails and Astrophotography
- Use the Bulb mode with a remote shutter release to capture long-duration exposures of star trails.
3. Silky Waterfalls and Rivers
- Use an ND filter to allow long exposure without overexposing the image. A 5-10 second exposure works best.
4. Cloud Movement in Landscapes
- A 30-second or longer exposure can create dramatic motion in sky clouds, adding interest to the scene.
5. Cityscape Glow
- Capture illuminated buildings with a long exposure to enhance their reflections on water surfaces.
Post-Processing Tips for Long Exposure Photography
1. Adjusting Exposure and Contrast
- Use Lightroom or Photoshop to fine-tune exposure, contrast, and highlights to enhance details.
2. Reducing Noise
- Long exposure images may have noise, especially in night shots. Use noise reduction tools for a cleaner look.
3. Enhancing Colors
- Adjust color tones to bring out the vibrancy of light trails and reflections.
4. Sharpening and Clarity
- Apply sharpening and clarity adjustments to maintain details without over-processing.
Common Mistakes and How to Avoid Them
1. Overexposed Highlights
- Use ND filters or lower ISO to prevent blown-out highlights in bright areas.
2. Camera Shake
- Always use a tripod and remote shutter release to avoid blurred images.
3. Underexposed Images
- Increase shutter speed or adjust exposure settings in post-processing.
4. Improper Focusing
- Always use manual focus and check sharpness through Live View.
Conclusion
Mastering long exposure photography opens up a world of creative possibilities, allowing you to capture breathtaking night shots with mesmerizing effects. By using the right equipment, camera settings, and composition techniques, you can elevate your photography skills and create stunning, professional-quality images.
Start experimenting with different exposure times, subjects, and angles to discover your unique style in long exposure photography. Happy shooting!
-
Vivo X300 Pro Photography Kit: Next-Gen Mobile Imaging
-

Empowerment Through Boudoir Photography: The Candid Shoot
-

Bold Photography: Creating Powerful & Confident Visual Stories
-

Jaipur’s Favorite Destination for Couple Shoots | The Candid Shoot
-
Vivo X300 Pro Photography Kit: Next-Gen Mobile Imaging
Discover the complete vivo X300 Pro photography kit guide with in-depth camera analysis, real-world case studies, portrait techniques, cinematic workflows, and pro-level tips. Learn how vivo X300 Pro transforms mobile photography for creators, influencers, and studio professionals. The vivo X300 Pro — Redefining Mobile Imaging for Creators Why the vivo X300 Pro Deserves a Dedicated
-
Empowerment Through Boudoir Photography: The Candid Shoot
Boudoir Photography as Empowerment Boudoir photography has evolved far beyond traditional notions of intimacy or sensuality. Modern boudoir photography is about empowerment, confidence, and self-expression, not merely performing for the camera. At its heart, boudoir photography is a visual dialogue between the subject and themselves, mediated by a professional photographer. It provides a private, safe
-
Jaipur’s Favorite Destination for Couple Shoots | The Candid Shoot
Why Couple Shoots Matter More Than Ever Couple shoots have evolved far beyond posed photographs and forced smiles. Today, couples look for experiences that feel natural, meaningful, and reflective of who they are together. A couple shoot is no longer about perfection. It is about presence, connection, and shared emotion. At The Candid Shoot, we
-
Bold Shoot Photographer with Studio in Jaipur | The Candid Shoot
The phrase “bold shoot photographer” often triggers assumptions—many of them incomplete, outdated, or shaped by stereotypes. In reality, bold photography has evolved far beyond shock value or surface-level aesthetics. Today, bold shoots represent self-expression, body confidence, emotional honesty, and artistic courage. At The Candid Shoot, bold photography is not about exposure—it is about expression. It
-
Styling Tips for Maternity Shoots: Looking Timeless, and Confident
Styling as the Silent Storyteller in Maternity Shoots Maternity shoots are not simply about documenting pregnancy. They are about honoring a season of transformation—physical, emotional, relational, and often spiritual. Styling plays a foundational role in how that transformation appears, feels, and endures through photographs. When people look back at maternity photographs years later, they rarely


