Gimbals have transformed videography by providing exceptional stabilization, allowing filmmakers and content creators to capture buttery-smooth, cinematic footage. Whether you’re shooting a wedding, a travel documentary, or a commercial project, mastering how to use a gimbal effectively can elevate your storytelling and video quality.
In this comprehensive guide, we’ll explore everything you need to know about using a gimbal, from choosing the right one to perfecting advanced filming techniques.
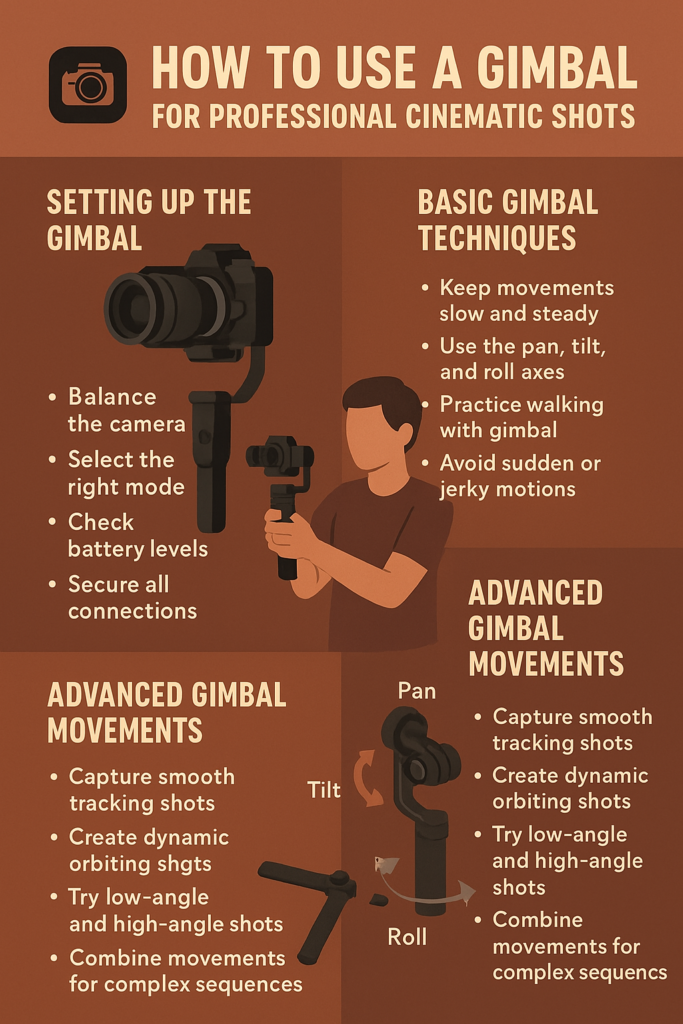
1. What is a Gimbal and How Does It Work?
A gimbal is a motorized stabilizer that neutralizes unwanted camera shake through three-axis stabilization:
- Pan (Yaw): Controls side-to-side horizontal movements.
- Tilt (Pitch): Adjusts the camera’s vertical position.
- Roll: Keeps the camera level by preventing unwanted rotation.
Types of Gimbals
- Handheld Gimbals: Ideal for DSLRs, mirrorless cameras, and smartphones.
- Wearable Gimbals: Mounted on helmets, vests, or chest rigs for action shots.
- Drone Gimbals: Used in aerial videography for ultra-stable drone footage.
- Cinema Rig Gimbals: High-end stabilizers for professional filmmaking setups.
Why Use a Gimbal?
✔ Achieve professional-level stabilization in any environment. ✔ Execute dynamic and complex camera movements smoothly. ✔ Enhance the visual storytelling of your videos. ✔ Elevate production value without the need for bulky rigs.
2. Choosing the Right Gimbal for Your Needs
Not all gimbals are created equal. When selecting one, consider the following factors:
Payload Capacity
Your gimbal must support the total weight of your camera, lens, and accessories.
- Lightweight Gimbals: Best for smartphones and action cameras.
- Mid-Range Gimbals: Suitable for mirrorless and DSLR cameras.
- Heavy-Duty Gimbals: Designed for cinema-grade cameras and rigs.
Battery Life
- Standard gimbals offer 8-12 hours of use per charge.
- Some high-end models support interchangeable batteries for long shoots.
Camera Compatibility
- Ensure the gimbal supports your camera model and lens setup.
- Consider mounting options for external microphones, lights, and monitors.
Smart Features
Modern gimbals include features like: ✔ Auto-tuning and calibration for effortless setup. ✔ Follow modes and subject tracking for creative flexibility. ✔ App control and wireless connectivity for easier operation.
Top Gimbal Brands
- DJI (Ronin Series: RS 3, RS 2, Ronin-SC)
- Zhiyun (Crane and Weebill Series)
- Moza (Air and Mini Series)
- FeiyuTech (AK and G Series)
3. Step-by-Step Guide to Setting Up a Gimbal
Step 1: Charge and Update Firmware
- Fully charge the gimbal before your shoot.
- Check for firmware updates via the manufacturer’s app.
Step 2: Mount Your Camera Properly
- Secure the camera onto the quick-release plate.
- Attach necessary accessories like microphones and monitors.
Step 3: Balance the Gimbal Correctly
Balancing prevents motor strain and ensures smooth movement.
- Tilt Balance: Adjust the camera’s front-to-back position.
- Roll Balance: Ensure the camera remains level.
- Pan Balance: The camera should stay stable when rotated.
Step 4: Calibrate the Gimbal
- Use the auto-calibration feature or adjust manually.
- Perform a test movement to check for vibrations or misalignment.
4. Mastering Gimbal Movements for Cinematic Shots
Basic Gimbal Movements
- Pan Shot: Smoothly rotate the camera from side to side.
- Tilt Shot: Move the camera up and down for dramatic angles.
- Tracking Shot: Follow a subject while walking steadily.
- Push-In & Pull-Out: Move closer or farther for depth.
Advanced Cinematic Techniques
✔ Orbit Shot: Move in a circular motion around the subject. ✔ Low-Angle Tracking: Shoot from ground level for dynamic movement. ✔ Dutch Tilt: Slightly rotate the gimbal for an artistic effect. ✔ Jib Shot: Simulate a crane movement by lifting smoothly. ✔ 360-Degree Roll: Spin the camera for action-packed sequences.
5. Optimizing Shooting Modes for Different Scenes
Follow Mode
- The gimbal tracks pan and tilt movements.
- Best for documentaries and vlogs.
Locked Mode
- The camera stays locked on a fixed composition.
- Ideal for cinematic static shots.
Point of View (POV) Mode
- The gimbal follows all three axes.
- Best for action shots and immersive filming.
360-Degree Roll Mode
- Enables full rotation for spinning shots.
- Used in music videos and creative commercials.
6. Tips for Smooth Operation
✔ Use Two Hands: Provides better control and stability. ✔ Walk Like a Ninja: Bend your knees and move smoothly. ✔ Control Speed: Avoid sudden jerky movements. ✔ Pre-Plan Shots: Map out movements beforehand. ✔ Practice Daily: The more you use it, the better you get.
7. Common Mistakes and How to Avoid Them
❌ Overloading the Gimbal → Stay within weight limits. ❌ Skipping Calibration → Always calibrate before use. ❌ Jerky Movements → Move slowly and deliberately. ❌ Ignoring Battery Life → Carry extra batteries. ❌ Poor Footwork → Practice smooth walking techniques.
8. Conclusion: Elevate Your Videography with a Gimbal
Mastering how to use a gimbal takes practice, but once you do, your videos will look more professional, cinematic, and visually compelling. By choosing the right gimbal, setting it up properly, and refining your movements, you can produce stunning, shake-free footage that enhances storytelling.
Final Takeaways:
✔ Invest in a gimbal that fits your camera setup. ✔ Balance and calibrate before every shoot. ✔ Experiment with different shooting modes and techniques. ✔ Avoid common mistakes for smoother operation. ✔ Keep practicing to refine your skills and create seamless video content.
FAQs
1. What is the best gimbal for beginners?
The DJI Ronin SC and Zhiyun Weebill S are great beginner-friendly gimbals with easy setup and smooth stabilization.
2. Can I use a gimbal with a smartphone?
Yes, smartphone gimbals like the DJI Osmo Mobile 6 and Zhiyun Smooth 5 provide professional stabilization for mobile videography.
3. How do I prevent my gimbal from shaking?
Ensure proper balancing, calibration, and controlled movements to prevent shakes.
4. Do I need a gimbal for vlogging?
If you want steady, professional-looking vlogs, a gimbal is highly recommended, especially for travel and action shots.
5. Can I use a gimbal for photography?
While gimbals are primarily for video, some models offer timelapse and motion tracking features for creative photography shots.
Book your right gear now with The Candid Shoot and create timeless memories today!
-
Vivo X300 Pro Photography Kit: Next-Gen Mobile Imaging
-

Empowerment Through Boudoir Photography: The Candid Shoot
-

Bold Photography: Creating Powerful & Confident Visual Stories
-

Jaipur’s Favorite Destination for Couple Shoots | The Candid Shoot
-
Vivo X300 Pro Photography Kit: Next-Gen Mobile Imaging
Discover the complete vivo X300 Pro photography kit guide with in-depth camera analysis, real-world case studies, portrait techniques, cinematic workflows, and pro-level tips. Learn how vivo X300 Pro transforms mobile photography for creators, influencers, and studio professionals. The vivo X300 Pro — Redefining Mobile Imaging for Creators Why the vivo X300 Pro Deserves a Dedicated
-
Empowerment Through Boudoir Photography: The Candid Shoot
Boudoir Photography as Empowerment Boudoir photography has evolved far beyond traditional notions of intimacy or sensuality. Modern boudoir photography is about empowerment, confidence, and self-expression, not merely performing for the camera. At its heart, boudoir photography is a visual dialogue between the subject and themselves, mediated by a professional photographer. It provides a private, safe
-
Jaipur’s Favorite Destination for Couple Shoots | The Candid Shoot
Why Couple Shoots Matter More Than Ever Couple shoots have evolved far beyond posed photographs and forced smiles. Today, couples look for experiences that feel natural, meaningful, and reflective of who they are together. A couple shoot is no longer about perfection. It is about presence, connection, and shared emotion. At The Candid Shoot, we
-
Bold Shoot Photographer with Studio in Jaipur | The Candid Shoot
The phrase “bold shoot photographer” often triggers assumptions—many of them incomplete, outdated, or shaped by stereotypes. In reality, bold photography has evolved far beyond shock value or surface-level aesthetics. Today, bold shoots represent self-expression, body confidence, emotional honesty, and artistic courage. At The Candid Shoot, bold photography is not about exposure—it is about expression. It
-
Styling Tips for Maternity Shoots: Looking Timeless, and Confident
Styling as the Silent Storyteller in Maternity Shoots Maternity shoots are not simply about documenting pregnancy. They are about honoring a season of transformation—physical, emotional, relational, and often spiritual. Styling plays a foundational role in how that transformation appears, feels, and endures through photographs. When people look back at maternity photographs years later, they rarely


