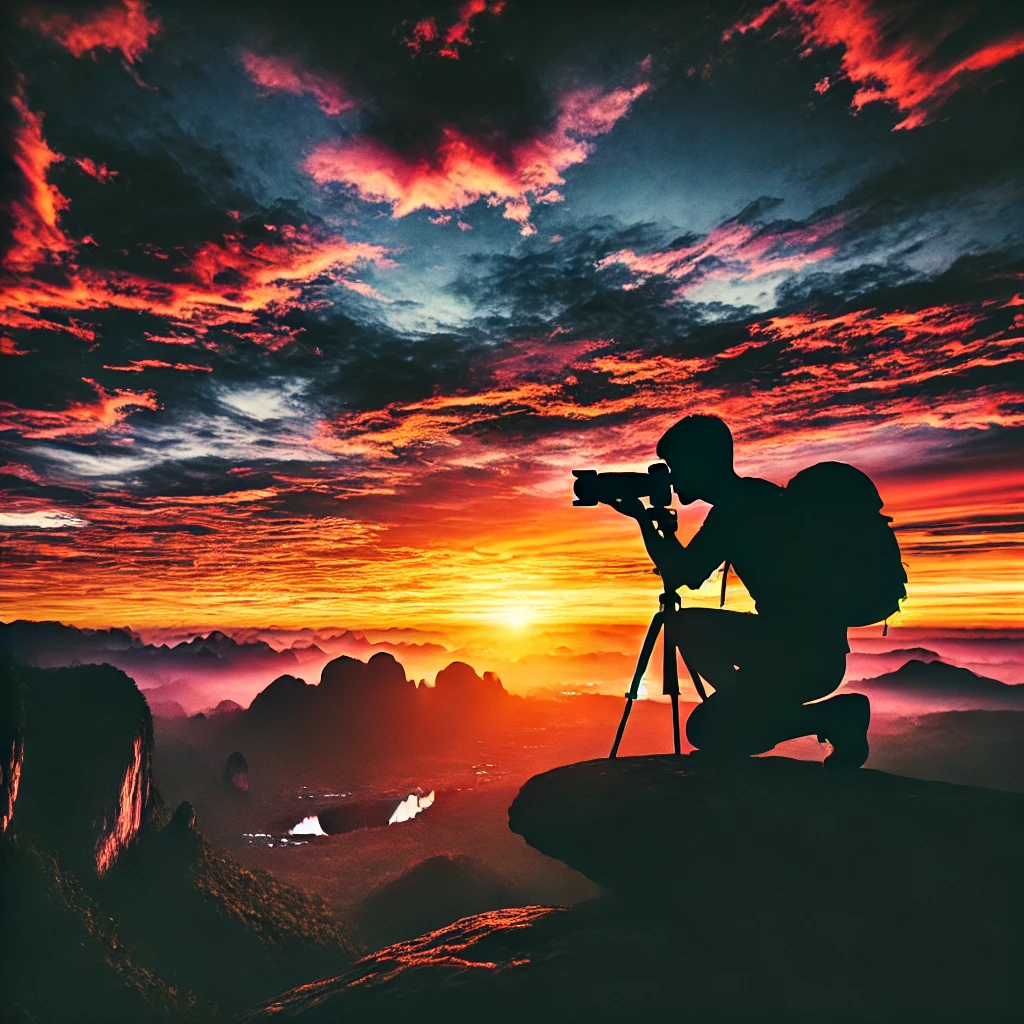
Silhouette photography is one of the most visually striking forms of photography. It allows photographers to create dramatic and artistic images by using backlighting to highlight a subject’s shape and outline while keeping the details in shadows. This technique is often used during sunrise and sunset when the natural lighting conditions are optimal. Whether you are photographing people, animals, landscapes, or architecture, mastering silhouette photography can elevate your portfolio and storytelling skills.
In this comprehensive guide, we will discuss:
- The fundamentals of silhouette photography
- The best time and locations for capturing silhouettes
- Camera settings for achieving perfect silhouettes
- Essential composition techniques
- Post-processing tips for refining your shots
- Common mistakes and how to avoid them
- Advanced silhouette photography ideas
Understanding Silhouette Photography
Silhouette photography works by positioning a strong light source, such as the sun, behind the subject while keeping the foreground dark. This contrast creates a dramatic effect that emphasizes the subject’s shape rather than its details.
Why Silhouette Photography Stands Out
- Creates Emotional Impact: Silhouettes evoke mystery, drama, and strong emotions.
- Minimalist Aesthetic: Simplifies the composition by focusing on the subject’s outline.
- Storytelling Element: Leaves room for interpretation, making images more engaging.
- Universally Appealing: Works well for travel, portrait, nature, and architectural photography.
Best Time and Locations for Silhouette Photography
Ideal Lighting Conditions
- Golden Hour: The best time for silhouette photography is during sunrise or sunset when the sun is low in the sky, creating a strong backlight.
- Twilight Hours: After the sun sets, the sky retains rich colors, providing a beautiful backdrop for silhouettes.
- Artificial Light Sources: Cityscapes, streetlights, and neon signs can serve as effective backlighting at night.
Best Locations for Silhouette Photography
- Beaches & Oceans: The open horizon and setting sun create stunning silhouettes.
- Mountains & Hills: Elevation allows for clean background separation.
- Urban Environments: Buildings, bridges, and cityscapes offer unique silhouette opportunities.
- Forests & Fields: Trees, lone figures, and wildlife stand out beautifully against the sky.
Camera Settings for Perfect Silhouettes
1. Manual Mode for Full Control
Silhouette photography requires control over exposure settings, so using manual mode is ideal.
2. ISO Settings
- Use ISO 100 or 200 to keep noise minimal and retain sharpness.
3. Aperture (f/stop)
- A narrow aperture (f/8 to f/16) ensures more elements in focus and enhances the overall sharpness of the silhouette.
4. Shutter Speed
- Use a fast shutter speed (1/200s or higher) to maintain sharp edges.
5. Focus Mode
- Switch to manual focus if autofocus struggles with backlit subjects.
6. Metering Mode
- Use spot metering to expose for the background rather than the subject.
Essential Composition Techniques
1. Strong Subject Placement
- Place the subject off-center using the rule of thirds for a balanced composition.
2. Use Negative Space
- Leaving empty space around the subject enhances visual impact.
3. Recognizable Shapes
- Ensure the subject has a clear and defined shape; avoid overlapping elements.
4. Leading Lines
- Use roads, bridges, or fences to draw the viewer’s eye to the silhouette.
5. Framing Your Subject
- Natural frames like doorways, arches, and tree branches add depth.
Post-Processing Tips
Even with great lighting and composition, post-processing can enhance your silhouette images.
1. Adjusting Exposure
- Increase contrast to deepen shadows and make the subject stand out.
2. Enhancing Colors
- Boost saturation in the sky to enhance sunrise and sunset hues.
3. Sharpening the Silhouette
- Use clarity and sharpness tools to refine edges.
4. Removing Distractions
- Use the clone stamp or healing tool to eliminate unwanted elements.
Common Mistakes and How to Avoid Them
1. Overexposed Subject
- Ensure the subject remains completely dark by metering the background.
2. Cluttered Backgrounds
- Choose a clean, open sky or simple backdrop to maintain clarity.
3. Poor Subject Recognition
- Position the subject in a way that makes their outline clear and distinct.
Advanced Silhouette Photography Ideas
1. Double Exposure Silhouettes
- Blend two images to create artistic silhouettes.
2. Silhouettes with Motion
- Capture subjects in motion, such as jumping or running, for a dynamic effect.
3. Reflections & Water Silhouettes
- Use lakes or puddles to create stunning mirror silhouettes.
4. Silhouettes with Smoke or Fog
- Adds an ethereal, dreamlike atmosphere to the shot.
Conclusion
Silhouette photography is a powerful way to create striking and emotive images. By mastering lighting, camera settings, and composition techniques, you can consistently capture breathtaking silhouettes. Whether you are photographing people, landscapes, or cityscapes, applying these techniques will take your photography to the next level.
Experiment with different subjects and lighting conditions, and don’t forget to post-process your images for the best results. Happy shooting!
-

Empowerment Through Boudoir Photography: The Candid Shoot
-

Jaipur’s Favorite Destination for Couple Shoots | The Candid Shoot
-

Bold Shoot Photographer with Studio in Jaipur | The Candid Shoot
-
Empowerment Through Boudoir Photography: The Candid Shoot
Boudoir Photography as Empowerment Boudoir photography has evolved far beyond traditional notions of intimacy or sensuality. Modern boudoir photography is about empowerment, confidence, and self-expression, not merely performing for the camera. At its heart, boudoir photography is a visual dialogue between the subject and themselves, mediated by a professional photographer. It provides a private, safe
-
Jaipur’s Favorite Destination for Couple Shoots | The Candid Shoot
Why Couple Shoots Matter More Than Ever Couple shoots have evolved far beyond posed photographs and forced smiles. Today, couples look for experiences that feel natural, meaningful, and reflective of who they are together. A couple shoot is no longer about perfection. It is about presence, connection, and shared emotion. At The Candid Shoot, we
-
Bold Shoot Photographer with Studio in Jaipur | The Candid Shoot
The phrase “bold shoot photographer” often triggers assumptions—many of them incomplete, outdated, or shaped by stereotypes. In reality, bold photography has evolved far beyond shock value or surface-level aesthetics. Today, bold shoots represent self-expression, body confidence, emotional honesty, and artistic courage. At The Candid Shoot, bold photography is not about exposure—it is about expression. It
-
Styling Tips for Maternity Shoots: Looking Timeless, and Confident
Styling as the Silent Storyteller in Maternity Shoots Maternity shoots are not simply about documenting pregnancy. They are about honoring a season of transformation—physical, emotional, relational, and often spiritual. Styling plays a foundational role in how that transformation appears, feels, and endures through photographs. When people look back at maternity photographs years later, they rarely
-
Mobile Photography Hacks: Candid Moments with Your Phone
Discover high-impact mobile photography hacks to capture genuine, gorgeous candid moments with your phone. Learn practical tips, composition secrets, and pro techniques to turn everyday scenes into stunning visual stories. Introduction: The New Age of Mobile Photography Photography has evolved beyond heavy cameras, technical jargon, and expensive equipment. Today, the power to capture extraordinary moments


